最近和Seeed合作,他们非常大方的给我提供了这些电子材料和开发板(再次感谢!),所以制作了一个智能家居系统,可以通过web软件界面或天猫精灵控制家里的灯、空调等设备。
B站视频:树莓派&Home Assistant – 打造【智能家居系统】 (上)
Youtube: https://www.youtube.com/watch?v=dyO7J_TPmkU
CSDN: https://blog.csdn.net/hardihuang/article/details/106846723
Hackster: https://www.hackster.io/SeeedStudio/smart-home-iot-system-based-on-raspberry-pi

【制作步骤】
一、安装集成Home Assistant的树莓派系统
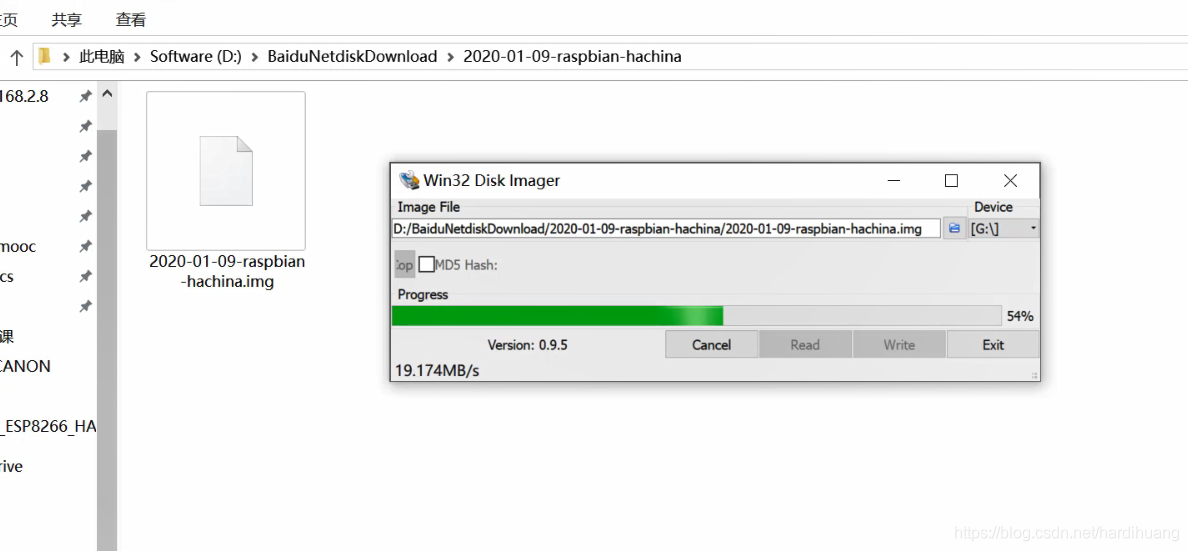
首先我们需要为树莓派的SD卡刷入系统,这里我选择直接集成Home Assistant的系统镜像,很方便。
下载地址:https://www.hachina.io/8408.html
下载好后用Win32DiskImager刷入SD卡。
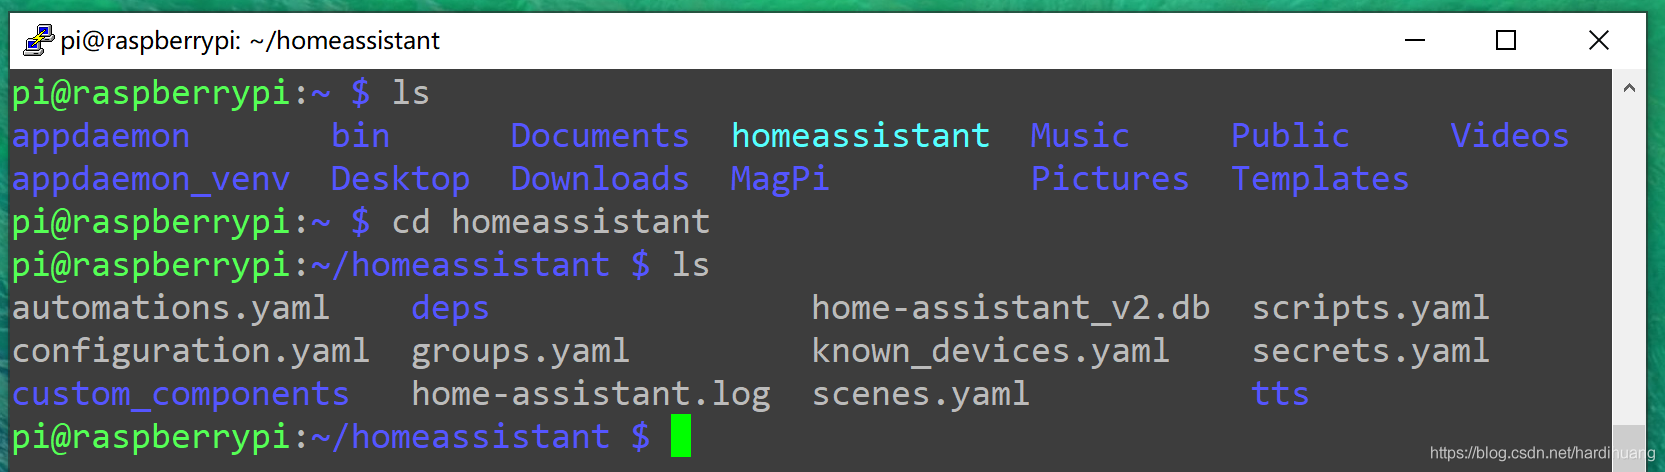
然后启动系统,进行一些系统的初始化设置,然后连接WIFI,我们打开终端,可以看到/home/pi路径下已经有一个homeassistant文件夹了,进去后可以看到里面有很多文件,因此我们不需要手动安装了。
我们使用ifconfig命令,可以得到当前树莓派的ip地址。

通过访问这个地址加端口号8123就可以打开Home Assistant的web端页面了,比如:192.168.123.116:8123。
第一次打开需要进行一些简单的设置,注册一个账户之类的,设置完成之后同一局域网下的设备就都可以通过这个IP用浏览器访问到安装在树莓派上的Home Assistant web端控制界面了。

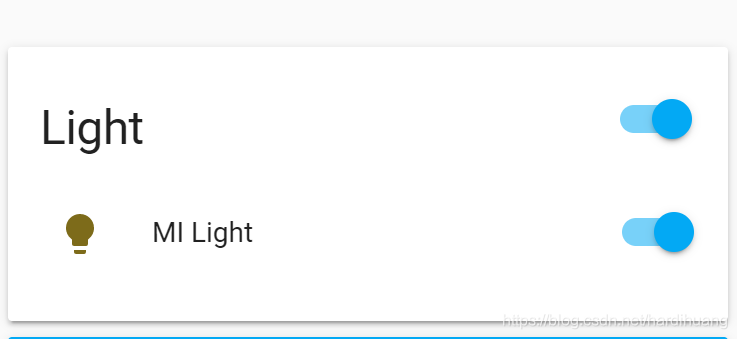
二、使用Home Assistant控制小米台灯
现在我们的home Assistant成功运行了,但是没有连接任何设备,因此我们无法控制,接下来我来连接一个书桌上的小米台灯,测试一下是否能够控制。
首先我们要在手机上打开yeelight的app,设置台灯可以使用LAN控制,然后在设备信息中获取台灯当前的ip地址。
然后在终端中使用nano打开/home/pi/homeassistant/configuration.yaml文件
在最下面添加下面的内容 (注意空格和冒号):
yeelight:
  devices:
    192.168.123.182:
      name: MI Light
然后通过下面的命令重启Home Assistant
sudo systemctl stop home-assistant@pi
sudo systemctl start home-assistant@pi
重启之后我们就可以看到主页面增加了一个控制卡片,我们便可以使用该按钮控制台灯的开关了。
三、使用Home Assistant控制ESP8266 I/O口
接下来我们如何为Home Assistant接入我们自己DIY的硬件设备呢?这里就要用到MQTT了。
MQTT(Message Queuing Telemetry Transport)协议是重要的物联网传输协议。越来越多的设备和节点,通过MQTT协议实现对外的通讯。
推荐大家去HACHINA的文档页面了解关于MQTT的知识:https://www.hachina.io/docs/7125.html
我们的系统中内置了MQTT服务,只需要在Home Assistant的配置文件中添加两行代码即可
(注意broker冒号后需要一个空格,否则会报错)
mqtt:
  broker: 127.0.0.1
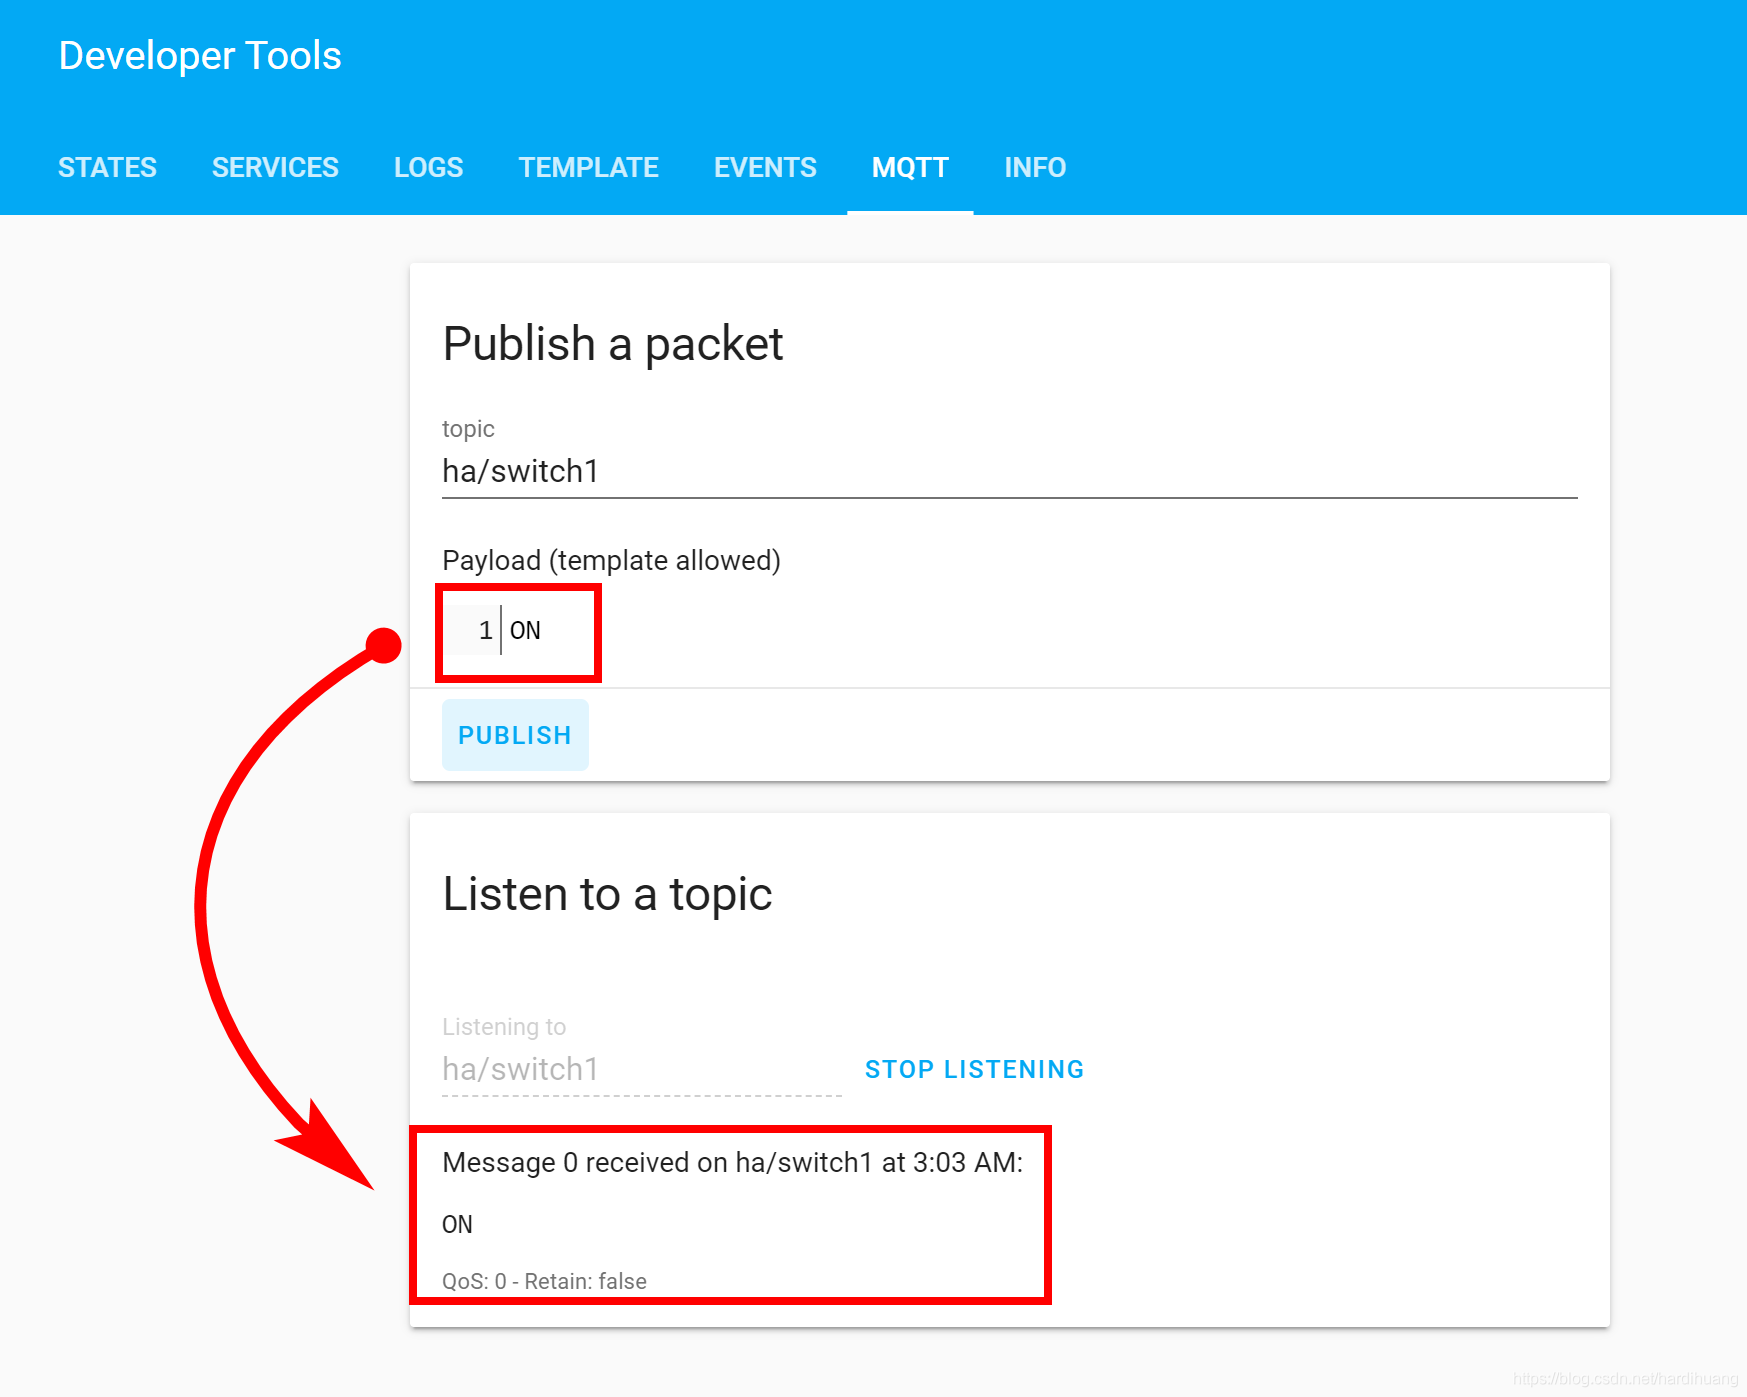
重启服务后,我们可以打开web端的Developer Tools的MQTT标签。
我们在Listen to a topic下方输入ha/switch1来监听这个topic,然后再Publish a packet中输入相同topic名,再Payload中输入ON后电机PUBLISH按钮,便可以看到下方的监听窗口就会出现刚刚发送的信息,证明我们的MQTT服务是OK的。
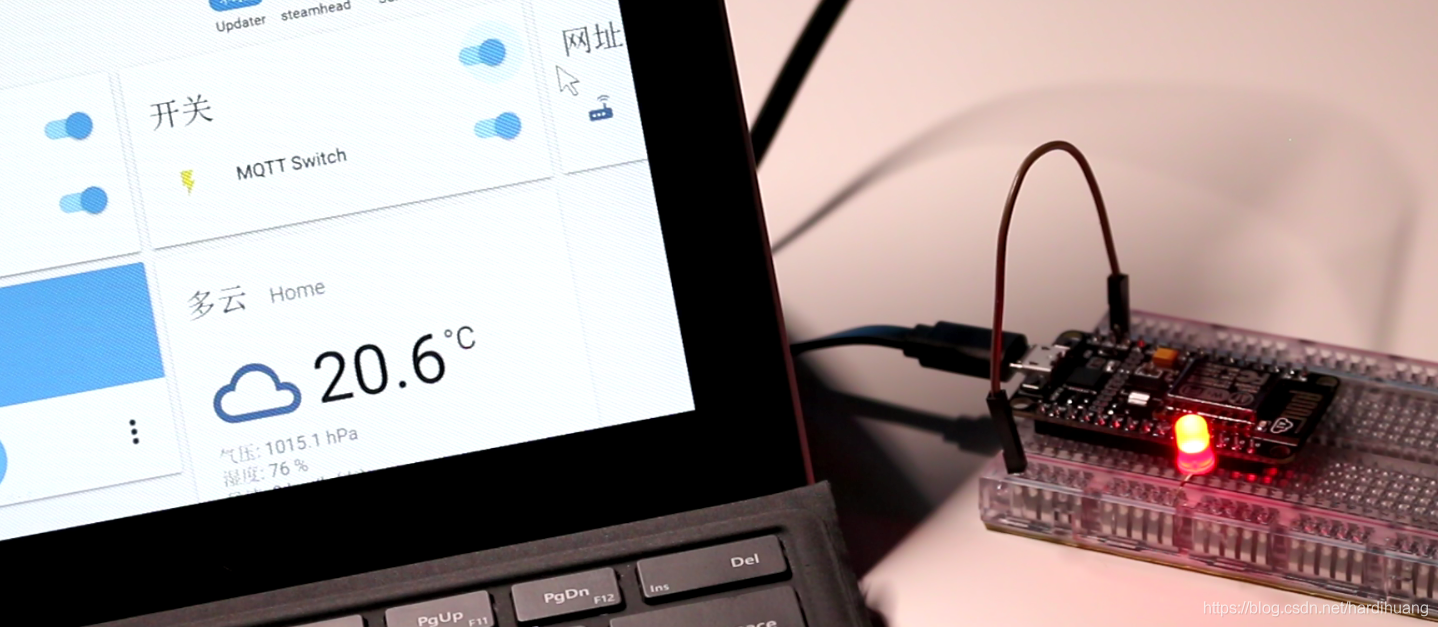
接下来我们为我们的ESP8266控制板刷入程序,来监听同一个topic(ha/switch1),并根据payload是ON或者OFF来控制I/O口的LED灯亮灭。[1]
首先我们要将代码中的SSID和password更改成我们自己的wifi名和密码,mqtt_server要设置为我们树莓派的IP地址。

上传完成后,我可以打开串口监视器,可以看到当我们发送一个ON或OFF值时,串口监视器中也会对应更新该命令,此时接在I/O口上的LED灯也会亮起或熄灭。
接下来我们为Home Assistant的主页面增加一个控制按钮,在configuration.yaml文件中添加下列内容:
switch:
  - platform: mqtt
    state_topic: "ha/switch1"
    command_topic: "ha/switch1"
    payload_on: "ON"
    payload_off: "OFF“
重启服务后我们便可以看到首页新增了一个MQTT Switch的控制按钮。
我们可以直接用这个I/O口驱动一个继电器,来控制一些电器的开关,比如灯,或者风扇。
此时我们还来控制空调、电视等用红外遥控可以控制的设备。
使用红外接收头读取到我们空调遥控器按下开关机按钮后的对应数据,并将他们保存起来,当接收到ON的值时,我们控制红外发射头发送这段数据,空调就可以开机啦!
uint16_t OFF[101] = {5832, 7344,  514, 3426,  516, 3426,  516, 3428,  514, 3428,  518, 1374,  514, 3430,  512, 3428,  514, 3428,  518, 1374,  518, 1374,  516, 1376,  516, 1376,  518, 3424,  514, 1378,  518, 1374,  518, 1374,  520, 1372,  514, 3428,  516, 3426,  518, 3424,  518, 1374,  518, 1376,  514, 1378,  516, 3426,  518, 3424,  516, 1376,  514, 1376,  514, 1378,  516, 3426,  516, 3426,  518, 3426,  516, 1374,  514, 3428,  518, 1374,  516, 3426,  516, 1376,  516, 3426,  518, 1374,  516, 1376,  518, 1376,  518, 1374,  516, 3426,  516, 1376,  516, 3426,  518, 1374,  518, 3422,  518, 3424,  514, 3426,  516, 7196,  518};
uint16_t ON[101]= {5832, 7322,  540, 3426,  516, 3426,  510, 3430,  518, 3426,  516, 1376,  516, 3426,  516, 1376,  514, 1380,  516, 1374,  516, 1376,  516, 1376,  514, 1376,  514, 3428,  516, 1378,  512, 3430,  516, 3424,  518, 1376,  514, 3428,  518, 3424,  516, 1378,  516, 1374,  512, 3428,  518, 3424,  516, 1378,  514, 3426,  514, 1378,  518, 1374,  514, 3426,  518, 3424,  514, 1376,  516, 1378,  514, 3426,  518, 3424,  518, 1374,  516, 3428,  514, 1378,  516, 3424,  516, 1378,  516, 1376,  516, 1376,  518, 1374,  516, 3426,  516, 1376,  516, 3426,  516, 1376,  516, 3424,  516, 3426,  518, 3426,  516, 7194,  518};
我们还可以使用DHT11来读取屋内环境温度/湿度,并且将数据返回到Home Assistant的页面上。当温度超过一定值时,自动打开空调。
四、使用语音助手控制Home Assistant设备
我们可以使用天猫精灵控制home assistant上的设备,比如说:天猫精灵,开灯
在customize.yaml里,为想添加到天猫精灵的设备加入一个friendly name,并在下加入一条 tmall_genie: true。
然后参考hassbian这篇文章《论坛新版天猫精灵接入技能正式发布!》,在天猫精灵app中添加该智能硬件,这样就可以实现语音控制了!
本文章内由 黄昊 && 伍树合作完成 :p
[1] ESP8266控制空调开关机程序:
#include
#include
#include
#include
#include

//ir
const uint16_t kIrLed = 4;  // ESP8266 GPIO pin to use. Recommended: 4 (D2).

IRsend irsend(kIrLed);  // Set the GPIO to be used to sending the message.
uint16_t OFF[101] = {5832, 7344,  514, 3426,  516, 3426,  516, 3428,  514, 3428,  518, 1374,  514, 3430,  512, 3428,  514, 3428,  518, 1374,  518, 1374,  516, 1376,  516, 1376,  518, 3424,  514, 1378,  518, 1374,  518, 1374,  520, 1372,  514, 3428,  516, 3426,  518, 3424,  518, 1374,  518, 1376,  514, 1378,  516, 3426,  518, 3424,  516, 1376,  514, 1376,  514, 1378,  516, 3426,  516, 3426,  518, 3426,  516, 1374,  514, 3428,  518, 1374,  516, 3426,  516, 1376,  516, 3426,  518, 1374,  516, 1376,  518, 1376,  518, 1374,  516, 3426,  516, 1376,  516, 3426,  518, 1374,  518, 3422,  518, 3424,  514, 3426,  516, 7196,  518};  // UNKNOWN FB60AF8D
uint16_t ON[101]= {5832, 7322,  540, 3426,  516, 3426,  510, 3430,  518, 3426,  516, 1376,  516, 3426,  516, 1376,  514, 1380,  516, 1374,  516, 1376,  516, 1376,  514, 1376,  514, 3428,  516, 1378,  512, 3430,  516, 3424,  518, 1376,  514, 3428,  518, 3424,  516, 1378,  516, 1374,  512, 3428,  518, 3424,  516, 1378,  514, 3426,  514, 1378,  518, 1374,  514, 3426,  518, 3424,  514, 1376,  516, 1378,  514, 3426,  518, 3424,  518, 1374,  516, 3428,  514, 1378,  516, 3424,  516, 1378,  516, 1376,  516, 1376,  518, 1374,  516, 3426,  516, 1376,  516, 3426,  516, 1376,  516, 3424,  516, 3426,  518, 3426,  516, 7194,  518};  // UNKNOWN 4C3D7CCD


// Update these with values suitable for your network.
const char* ssid = "xxx";
const char* password = "xxx";
const char* mqtt_server = "xxx";//youe raspberry pi ip address

WiFiClient espClient;
PubSubClient client(espClient);
int SwitchedPin = 0;
String switch1;
String strTopic;
String strPayload;

void setup_wifi() {
 Serial.begin(115200);
 irsend.begin();
  delay(100);

  // We start by connecting to a WiFi network

  Serial.println();
  Serial.println();
  Serial.print("Connecting to ");
  Serial.println(ssid);

  WiFi.begin(ssid, password);

  while (WiFi.status() != WL_CONNECTED) {
    delay(500);
    Serial.print(".");
  }

  Serial.println("");
  Serial.println("WiFi connected");
  Serial.println("IP address: ");
  Serial.println(WiFi.localIP());
}

void callback(char* topic, byte* payload, unsigned int length) {
  payload[length] = '\0';
  strTopic = String((char*)topic);
  if(strTopic == "ha/switch1")
    {
    switch1 = String((char*)payload);
    if(switch1 == "ON")
      {
        Serial.println("ON");
        digitalWrite(SwitchedPin, HIGH);
        irsend.sendRaw(ON, 101, 38);  // Send a raw data capture at 38kHz.
        Serial.println("ON");

      }
    else
      {
        Serial.println("OFF");
        digitalWrite(SwitchedPin, LOW);
        irsend.sendRaw(OFF, 101, 38);  // Send a raw data capture at 38kHz.
        Serial.println("OFF");

      }
    }
}


void reconnect() {
  // Loop until we're reconnected
  while (!client.connected()) {
    Serial.print("Attempting MQTT connection...");
    // Attempt to connect
    if (client.connect("arduinoClient")) {
      Serial.println("connected");
      // Once connected, publish an announcement...
      client.subscribe("ha/#");
    } else {
      Serial.print("failed, rc=");
      Serial.print(client.state());
      Serial.println(" try again in 5 seconds");
      // Wait 5 seconds before retrying
      delay(5000);
    }
  }
}

void setup()
{
  setup_wifi();
  client.setServer(mqtt_server, 1883);
  client.setCallback(callback);

  pinMode(SwitchedPin, OUTPUT);
  digitalWrite(SwitchedPin, LOW);
}

void loop()
{
  if (!client.connected()) {
    reconnect();
  }
  client.loop();
}
[2] Home Assistant configuration.yaml 完整文件:
mqtt:
  broker: 127.0.0.1

switch:
  - platform: mqtt
    state_topic: "ha/switch1"
    command_topic: "ha/switch1"
    payload_on: "ON"
    payload_off: "OFF"

tts:
  - platform: google_translate
    language: 'zh-cn'

media_player:
  - platform: vlc

yeelight:
  devices:
    192.168.123.182:
      name: MI Light


tunnel2local:
 # frpc命令位置
  frpc_bin: "/home/pi/bin/frpc"


group: !include groups.yaml
automation: !include automations.yaml
script: !include scripts.yaml